Ever snapped a photo that looked like it was taken in a sandstorm? Chances are, your camera ISO was off. ISO is key to getting bright, clear photos. Let’s learn how to master it. This guide will help you take better, brighter, and cleaner photos.
What is ISO in Photography?
ISO tells your camera how sensitive to be to light. Think of it like this: the higher the ISO, the less light you need to take a good picture. Back in the old days, ISO stood for film speed. It showed how quickly the film reacted to light.
ISO Definition
ISO amplifies the signal from your camera’s sensor. When it’s dark, boosting the ISO can make your image brighter. Be careful, though! Too much ISO can make your picture grainy.
ISO and Film Speed
Film speed and ISO are closely related. Film speed told photographers how sensitive their film was. Digital cameras use ISO in a similar way. The lower the number, the less sensitive to light.
The Exposure Triangle
Aperture, shutter speed, and ISO work together. They form what is known as the exposure triangle. Adjusting one affects the others. Finding the right balance is key to a well-exposed image.
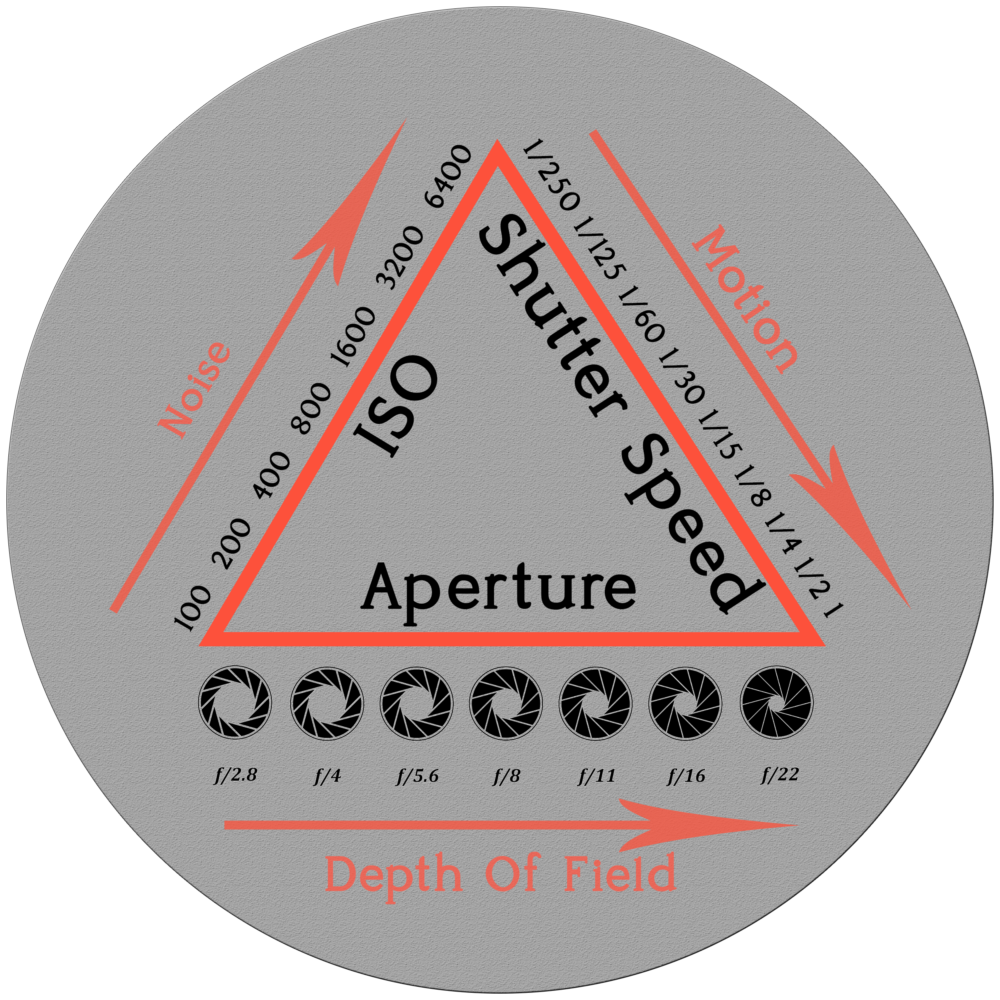
The ISO Scale and its Impact on Image Brightness
ISO is measured in numbers like 100, 200, 400, and so on. Each step affects how bright your photo will be. Getting to know this scale is a big deal to learn photography.
Base ISO Explained
Your camera’s base ISO is usually the lowest setting, often ISO 100. This setting gives you the best image quality. It has the least amount of noise. Always try to shoot at base ISO when you can.
ISO Doubling and Brightness
Doubling the ISO doubles the brightness of your photo. So, going from ISO 100 to ISO 200 makes the image twice as bright. Going from ISO 200 to ISO 400 does the same. Keep this in mind when adjusting your settings.
Real-World Example
Imagine you are shooting indoors. At ISO 100, the image may be too dark. Bump it up to ISO 400 or 800. See how much brighter the image becomes? Just watch out for noise!
Understanding Image Noise and ISO
High ISO can cause image noise. Noise looks like tiny dots or grain in your photo. Understanding how ISO affects noise is crucial.
What is Image Noise?
Image noise is unwanted artifacts that show up in your photos. Luminance noise looks like grain. Chrominance noise shows up as color blotches. Both can ruin the quality of your pictures.


ISO and Noise Levels
The higher your ISO, the more noise you will see. This is because the camera is working harder to brighten the image. Try to keep your ISO as low as possible.
When is Noise Acceptable?
Sometimes, a little noise is okay. If you need a high ISO to capture a moment, go for it. You can always try to reduce noise in editing. Capturing the photo is more important.
When to Adjust Your Camera’s ISO
Knowing when to change your ISO is key to getting good shots. Here are some times you’ll need to make adjustments.
Low Light Photography
When it’s dark but you cannot extend shutter speed, you’ll need a higher ISO. This lets your camera capture more light. Without it, your photos will be too dark.
Actionable Tip
Use Auto ISO. Set a limit to keep noise down. This way, your camera adjusts the ISO but doesn’t go too high.
Indoor Photography
Indoor settings often have less light than outdoors. A higher ISO can help. Try starting around ISO 400 or 800. Adjust as needed.
Bright Light Photography
On a sunny day, you will want a low ISO. This keeps your photos from being too bright. ISO 100 is often a good choice.
Real-World Example
Shooting outdoors on a sunny day? Keep your ISO low. This helps prevent overexposure and keeps the image clean. Don’t forget your lens hood to protect against lens flare!
Advanced ISO Techniques and Considerations
Once you grasp the basics, you can try advanced tricks. These can help you get even better results.
ISO Invariance Explained
ISO invariance means that increasing ISO in camera or in post-processing gives similar results. Some cameras are better at this than others. If your camera is ISO invariant, you can underexpose the image and fix it when editing.
Pushing and Pulling ISO
Pushing ISO means setting a lower ISO than needed and brightening the image later. Pulling ISO means doing the opposite. These techniques can help you manage noise.
Camera’s Native ISO
Your camera’s native ISO is where it performs best. Find out what it is. Sticking close to it will give you the cleanest images. Usually, it is the lowest ISO setting.
Minimizing Noise at High ISO
Even with high ISO, you can reduce noise. Here are a few tips to try.
Shoot in RAW Format
RAW files keep more image data than JPEGs. This gives you more flexibility when editing. It also helps reduce noise.
Noise Reduction Software
Use software to reduce noise. Experiment with different programs to see what works best for you.
Proper Exposure
Exposing to the right (ETTR) means making the image as bright as possible without clipping highlights. This gives you a cleaner image. It also helps minimize noise in post-processing. Take note of your metering mode.
Other Important Ingredients
ISO is but one small part of the photo taking process. Consider leading lines, drama in your composition, the rule of thirds, sharpness, the reciporocal rule, shutter speed and aperture as contributing factors as you make that perfect image.
Conclusion
ISO controls your camera’s sensitivity to light. It affects brightness and noise. Understanding ISO will help you take amazing photos. Experiment with your camera. Practice makes perfect! ISO is just a tool. Use it to create great images.
A Selection Of Guide Articles
Inspiration for Landscape Photography
Find your inspiration for landscape photography in many forms, from peaceful relaxation in nature to visiting galleries or hunting online
Long Exposure Photography
Long exposure photography tips and tricks, understanding filters and the role light plays in choosing the right camera settings
Using Reflections In Landscape Photography
We look at how to best use reflections in landscape photography as the method to add symmetry to you compositions
Adapting A Vehicle For Landscape Photography
We talk about the thought process and steps we took to make life easier when adapting a vehicle for landscape photography
RAW Format Photography
Understanding Camera RAW format files and why they are best for photographers wanting optimal image quality and processing flexibility
Mastering Exposure
Mastering exposure requires understanding of the three principal mechanisms: shutter speed, aperture size, and the photographic material's level of sensitivity to light (ISO)
Essential Filters for Landscape Photography
Read about the essential filters for landscape photography to make your life easier and take your images to the next level
How To Photograph Winter Landscapes
How to photograph winter landscapes, gear, what you need to consider and understanding the how snow affects light