Getting into landscape photography often means finding new, wild spots. But how do you get to those remote places and stay comfortable once you’re there? A dedicated vehicle for photography can be your best tool. It boosts your mobility, keeps your gear safe, and lets you stay out longer. But that can be expensive. Very expensive. So why not adapt your current vehicle? It can make all the difference in how smooth and fun the adenture is. Here’s how we went about adapting a vehicle for landscape photography.
Planning Your Vehicle Conversion
We’ll talk here about what we have done and why. That’s not to say this is the only way or even the best way to do things. but it’s the way we’ve done it. So use this to take inspiration for what to do…..or not!
Assessing Your Vehicle’s Suitability
Before you start adding gear, look closely at what you already have. Not every vehicle is perfect suited for adapting to photography travels. Factors like size, shape, and how much weight it can handle matter. For example, SUVs, vans and station wagons are popular for conversions. They stand out because they have enough space for beds, storage and gear. Think about how easy it is to get in and out when carrying tripod or camera bags. Or how easy it is to get to something when the vehicle is fully packed. If you’re planning a long trip, think about how much room you’ll need for essentials and comfort. On the flip side, it may not be financially viable to have a dedicated vehicle so adapting vehicle you already have for photography is the order ofthe day.
Our Thought Process
We had a car that was perfect for really long journeys. We had purchased an SUV initially with the idea of covering long distances within the United States to wherever we wanted to photograph, without the need to fly. Our thought process for adapting a vehicle for landscape photography was:
- not having to endure the nonsense that is airport security theatre
- not having to worry about any camera gear/bags being a problem at check in
- travelling in more comfort than any airline can provide
- taking more gear without incurring spurious airline fees
- not worrying about bags fitting in overhead storage bins
- option to change our plans on a whim
Identifying Your Needs and Priorities
This should be where you make your list. We did. It was something like this:
- how much storage do we need
- do we want to sleep in the car
- inside
- roof top tent
- how far away would we be from civilization
- how long would we be away from civilization
- do we want the ability to make hot drinks
- do we want the ability to make hot meals
- would those meals be rehydrating ready meals
- would those meals need multiple pots and pans
- do we want a lightweight setup or semi permanent
- do we want a charging system other than the vehicle 12v
To start with, it made sense to us to imagine the scope – what we would be photographing, together with where and, importantly, what time of year. Polar bears, in Alaska, in January would yield a whole different set of requirements than a lighthouse, on a summer’s evening in The Outer Banks!
For us, the answers to the questions were – a fair amount, occasionally yes/inside, hours, a day or two, yes/yes/yes, semi permanent, absolutely.
Knowing that we then applied the likely scope of contiguous 48, spring/summer/fall, national parks/mountains/deserts/beaches.
With that we could start to assemble the list of items we had, would need and would like if we had space.
Budgeting and Cost Considerations
Adapting a vehicle for landscape photography doesn’t have to break the bank. Costs can vary from a few hundred dollars for DIY updates to thousands for professional conversions. After a couple of short-ish trips to get the feel of the vehicle and how we use it made it was clear some strategic organization was required. Travelling with 2 camera bags, a camera case, a drone case, two suitcases and some peripheral items caused a lot of issues. Constantly moving stuff around to get to what you want at that crucial moment in time is less than ideal.
Designing the Interior Layout for Optimal Comfort
Maximizing Space and Functionality
Limited space means smart designs are a must. The first practical thing i did was to remove the 3rd row seating because we wouldn’t need it and it was eating into the storage space. I then set about figuring out the best way to ensure that everthing had a home and was still accessible in a reasonable amount of time. Plus, of course, it should be stored in a way that it won’t become a deadly projectile in the event of an incident.
Luckily, the internet is your friend here. Simply search on your vehicle and see what steps other enterprising souls have taken adapting their vehicle for photography or overlanding. Copy or tweak the good bits, discard the stuff that is not relevant.
Show Us Your Drawers
Draw systems are very popular for a reason. With the boom in overlanding a few years ago due to ‘that thing’ there are plenty of options out there, from designs to build your own through to fully finished and installed options. I am reasonably handy when it comes to DIY type stuff so I figured out the type of draws we would like, the height of the platform etc and then set about listing all of the parts needed to assemble such a masterpiece.
This is where the build kits come into play. Getting the right fittings was not the problem. But the floor of our SUV had certain design feature requiring various stand-offs. These would be necessary to remove any strain and twist on parts and keep the draws opening smoothly. Then there was the cost of materials, draw slides and fittings.
Weighing The Options
After I sat down with MrsFaceless the best option became quite clear. For a few hundred dollars more than sourcing the parts alone I could purchase a system from a vendor which was guaranteed to fit. If you’ve seen some of our videos you’ll have seen it as I made food and drinks. Thank you very much AirDownGearUp. Not sponsored and paid for in full out of my own pocket. Very happy with the system and always get plenty of comments from other travellers when out and about, even in the middle of nowhere!
Creating Storage and Organization Systems
Clutter can ruin a trip. Proper storage keeps things safe and easy to find. Within the draws I used storage totes to organize and group items and prevent them moving around. You could label your storage boxes so you can grab what you need quickly, but mine are transparent so that works as well. For ease of use, keep all similar items together, such as your cooking kit or wash gear. This saves time and keeps your vehicle tidy, making packing and unpacking faster.
Choosing and Installing Sleeping Arrangements
Adapting a vehicle for landscape photography may need to include sleeping arrangements. Sleeping options depend specifically on your vehicle type and how you camp. We had decided to forego the roof top tent, for now at least. Although I have revisited this several times, each time i have failed to justify getting one when looking at all the pros and cons. That may be different for you, or even us in the future.
Hence, the choice for adapting our vehicle for landscape photography involves sleeping inside. The rear seats fold down and are at a similar height to the ADGU draw system. I didn’t purchase the sleeper option despite our intention, instead I spent a little more on a really good quality sleeping pad. The Exped Megamat. So comfy. I am a side sleeper and this thing rocks! MrsFaceless was not keen on the idea of sleeping in the car. She has done it. So, yay MrsFaceless! Even she admitted it was ‘ok’. High praise indeed.
The MegaMat is not cheap, but as the old saying goes, investing in good gear now will pay off over time.
Skeleton Done
With the draw system now installed and sleeping option arranged it was time to work on the next set of requirements and continue adapting the vehicle to make our photography trips more enjotable.
Essential Power Equipment and Accessories
Power and Lighting Solutions
For a photographer, there seems to be no end of battery-powered devices and a constant need to recharge them. Then there’s getting back to the vehicle in the dark as you try not to stumble around, or in the morning grabbing your gear before a long hike. Power is needed both for charging and equally for lighting. In some circumstances it may also be used for cooking. We knew that our long trips were infrequent enough to keep a secondary, or house battery, charged. Our SUV is also garaged, so whilst it is protected from the elements, there is no option to run a trickle solar charger or similar. Don’t rely solely on your vehicle’s starter battery, especially if you are staying in one place for several days. You will need that to start the vehicle so don’t drain it flat!
Another List Time
Once again, it’s a good idea to make a list of all of the items that you will likely need to charge. The pertinent point here is what connection does each one take and hence how many outlets of each type are you likely to need concurrently. For example, do you use a wall charger for your camera battery or is it USB type A or C? Have a drone? Micro usb or C? Then what about day to day items like your cell phone or gps device? Are they going to need to be charged from the same system as your other electronics or will they be plugged into the vehicles’s outlets, or even hardwired for things like GPS/SatNav and dash cam.
KISS
KISS – Keep It Simple Stupid. A great acronym to remind everyone to try and simplify matters. I decided to split the charging requirement into 2 groups. First group would be the photo and video gear and for that I would look at a separate solution due to the number of needed charging outlets. For the second group, specifically GPS/SatNav, dashcam and cell phones, i would look to engineer something based around the vehicle’s own electrical system. The reason for this thinking on the second group is that when driving all of those items would be in use so it made sense to tie power delivery to the engine running.
Down To The Wire
I hardwired the dash cam using the simplest method, a fuse tap to an ignition controlled circuit. For the SatNav and phones, both needed some form of USB connection. I was lucky that there are plenty of after market USB outlets that mimic the manufacturer switch blanks of the vehicle had. So I added 4 USB A OEM style outlets to the driver’s side and a normal 2 USB A outlet that you can find anywhere on the interwebs to the passenger center console. That provides 6 USB outlets at the front of the car.
Guilty As Charged
The final thing i did was to run a separate USB A to C cable through the dash, up the A-pillar and, neatly tucked into the headlining, it drops out just to the side of the dash cam. With that completed these USB ports can power a GoPro to film as we drive, 2 cell phones and our SatNav/GPS device. That leaves 2 outlets spare, just in case.
Power To The People
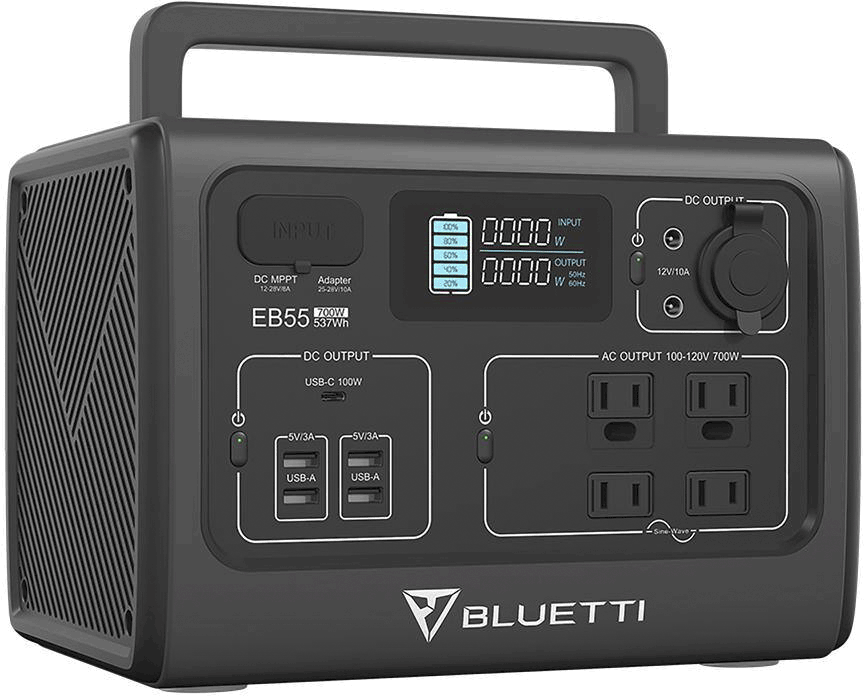
I opted to purchase a Bluetti power system as this was both a viable solution to our power needs as well as portable. It has been a hard working unit, but has more than held its own since 2021. Again, not sponsored and paid for out of my own pocket. We do have the solar panels to assist recharge but have either used a hotel stop, a quick visit to friends or a feed from the vehicle’s power outlet to keep it charged.
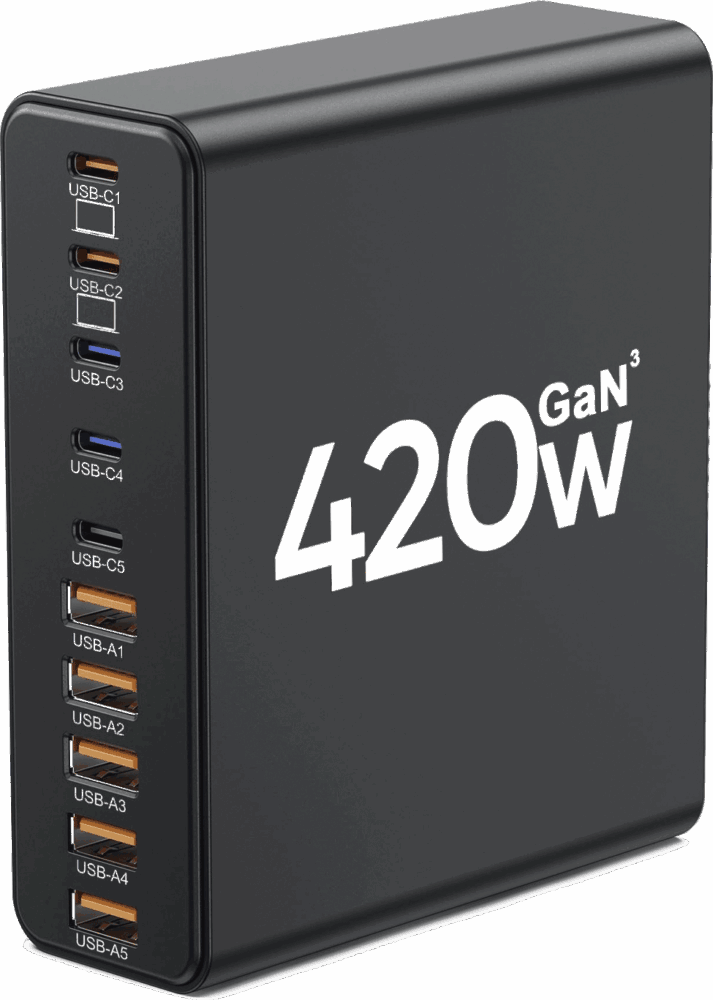
Our SUV has an inverter to the rear of the car so i have recently adopted a multi-outlet USB wall charger with a USB C to XT-60 as a means to charge the Bluetti. A single USB C port can throughput 100W which is plenty to charge the unit on a daily basis whilst still well within the limits of the vehicle’s system. The added bonus is plugging the multi port into the Bluetti to give even more charging outlets when the engine is not running.
So Near So-Lar
I have talked several times to FacelessBrotherInLaw about solar panels. He has used these on his vehicles when off-grid and has had reasonably good experiences. However, where he lives there is little to no chance of someone either damaging or stealing them. MrsFaceless and I are not in that part of the country. Yet. So whilst we see continued use of the Bluetti for some time yet, the option to recharge will require us running the engine or acquiring electrickery from a wall socket rather than relying passively on the sun as we take our photos.
Light Of My Life
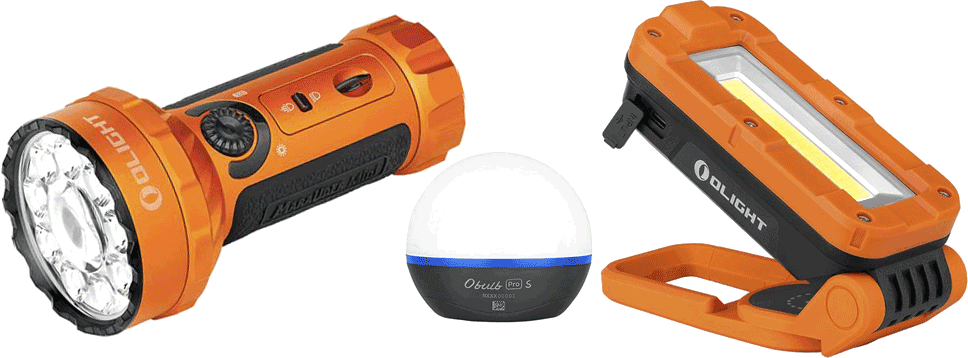
Lighting is key too. Inside the vehicle I have a pair of the tiny Olight Obulb. I generally leave them on red mode and have them sitting on a shelf ready for quick use. Red light is obviously preferred in scenarios where you don’t want to attract hordes or mozzies and the like. I have one very powerful torch (the Olight Marauder Mini – what a beast that is!) that I use to either light paint or to see what animal made that horrendous noise as they close in on me for the kill. I have another Olight, the swivel pro, which has a magnetic, twist/pivot base which i generally use when doing any work around the car. Again, all of these were paid for out of my pocket. Not sponsored, but I would buy them all again in a heartbeat. Keep an eye out as they regularly have deals on Olight items on the old rainforest website.
Shine A Light
Quite often we return to the vehicle and then have to drive along winding or country roads in the dark. Adapting a vehicle for landscape photography and those late evening post sunset hikes calls for additonal lighting. On the outside of the vehicle I have mounted such additional lighting. Ditch lights really help for those dark and remote roads, especially if deer/elk/wildebeest are about. Some scene lights, which tuck just under the roof rack rails, throw light to either the side of the vehicle which helps when setting up or breaking camp in the dark. All the lights have an amber colour. They are controlled by an Auxbeam switch controller, mounted to the center console with all the gubbins neatly mounted in the engine bay.
Talk To Me
Also controlled by the Auxbeam switch is power to a vehicle mounted GMRS radio. We have hand helds for hiking but use this one when in the vehicle. I have the brains of the unit mounted in a gap under the draw system, with power run from the engine bay. The controls are all in the handset which plugs into an OEM style receptor placed into a blank by the steering wheel and connects to the brains via a cat6 cable.
Cooking and Food Prep
Space Eater
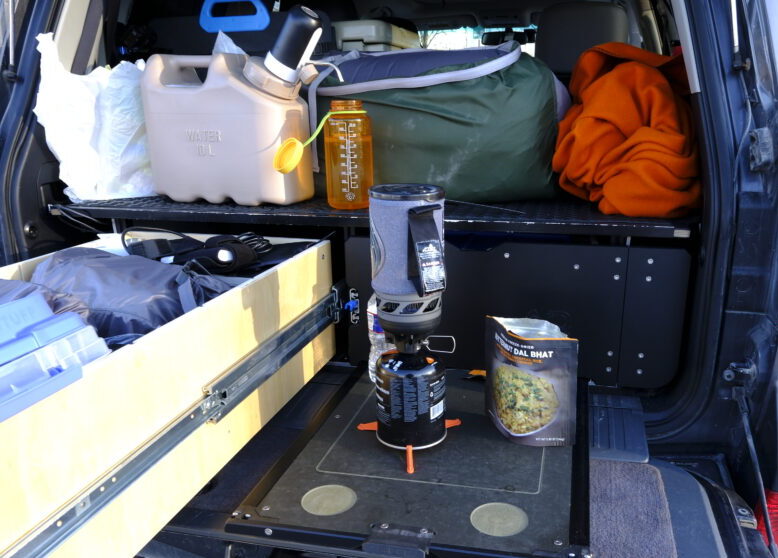
Probably the biggest issue to adapting a vehicle for landscape photography is space. Space is limited in all but the biggest vehicles, so choosing the right combination of gear is important. As mentioned earlier, our checklist had us ‘off-grid’ regularly for several hours and maybe a day or two away from civilization at tops. We had a cooler and figured that would be sufficiently large and stay cool enough for that time period. We use freezer blocks and always freeze them when we stay overnight in hotels. Buying ice is also an option. For water we have a small and large Scepter container which are excellent.
I Scream
We have also investigated the options for a fridge/freezer combo a couple of times. Ideally it would fit behind the front seats so it can be accessed easily when either driving or a quick pit stop. A similar volume unit would still take up less room than the equivalent cooler and we are well within power limitations. That would allow us to take a little more food for longer, or an increased variety of food. Including MrsFaceless’ favourite, ice cream.

Espresso Yourself
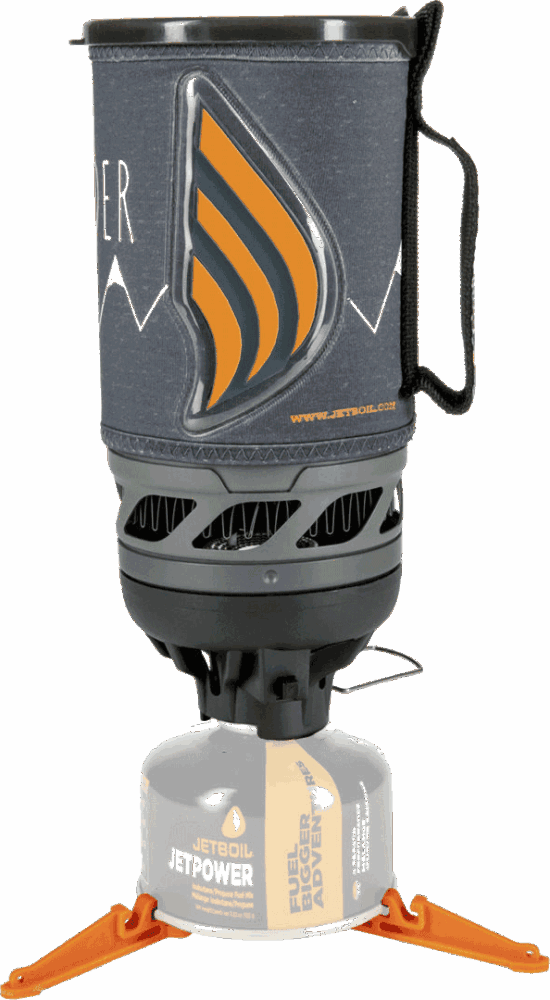
If you are anything like MrsFaceless and I, then you will also require regular infusions of liquid magic, or as some people call it, coffee. This is relatively simple to achieve, even ‘off grid’. I have my preferred coffee – none of that American mud-in-a-cup stuff for me. A jetboil and gas cannister gives anyone the ability to quickly boil water and the draw system has a fabulous slide out table for prep. Job done! I keep the jetboil, coffee, sweeteners and spoons, along with plates and condiments, in its own box, right at the front of the draw as it’s used so regularly. Mmmmmm…..coffee.
Food For Thought

Your cooking solution will very much depend upon what you want to eat. With the Jetboil we can quickly rehydrate ready meals. There are some that we really like, whilst others not so much, my favourite being Peak Refuels, Butternut Dal Bhat. They are a relatively easy way to get hot food inside you and give you a chance to vary your options from a penaut butter sandwich or cold meats. We also have a pot and a pot stand for the Jetboil increasing the options. Some pasta, tomato sauce and a chopped up, pre-cooked sausage taste amazing after a long day. FacelessBrotherInLaw has a white gas burner which we have used too. The stand for that is way better for a frying pan. The similarity is that these options use little space when store away.
The Final Frontier
It’s all about space. If space is not at such a premium when adapting a vehicle for landscape photography, then an option like the Jetboil Genesis or Coleman stove may work for you. If you have sufficient electrickery reseves, like a house battery, then an induction cook top is also an option. The advantage with induction is easier cleanup and no requirement to carry flammable butane, propane or white gas. Also it’s a much easier shape to pack efficiently. Prices for such single units has come down drastically in the last couple of years but i have yet to try one, nor can i attest to their quality or longevity.
Winner, Winner
Who doesn’t like a chicken dinner? One simple option to speed up food delivery when travelling is to prepare food at home and vacuum seal. Chicken, or beef, with appropriate spices opens up the possibilities of wraps or tacos. This is also where the fridge/freezer would be a big benefit. Vacuum sealing, apart from helping to preserve the food, is possibly the most efficient way to make food fit in the least amount of space possible. When preparing food at home i will sometimes freeze food like chilli or curry into cube shapes before sealing and putting into the freezer as this allows me to more easily stack the items!
Comfort and Weather Protection Accessories
To keep the elements outside I added wind deflectors. Combined with sock type bug screens we can have the windows open on a warm night, even if it’s raining, and get a nice breeze without being eaten alive or soaked inside. Ventilation is good as it also prevents condensation build up within the vehicle. As i like to sleep in the dark I also purchased a set of shades designed specifically for the vehicle. These block light at night and refelct heat on sunny days. For colder trips, I’ve add a small heater with tip-over protection and a fan to provide a cooing breeze on warmer nights. Both run from the Bluetti and take very little power.
Safety and Security Upgrades Inside the Vehicle
Fire and Emergency Equipment Storage
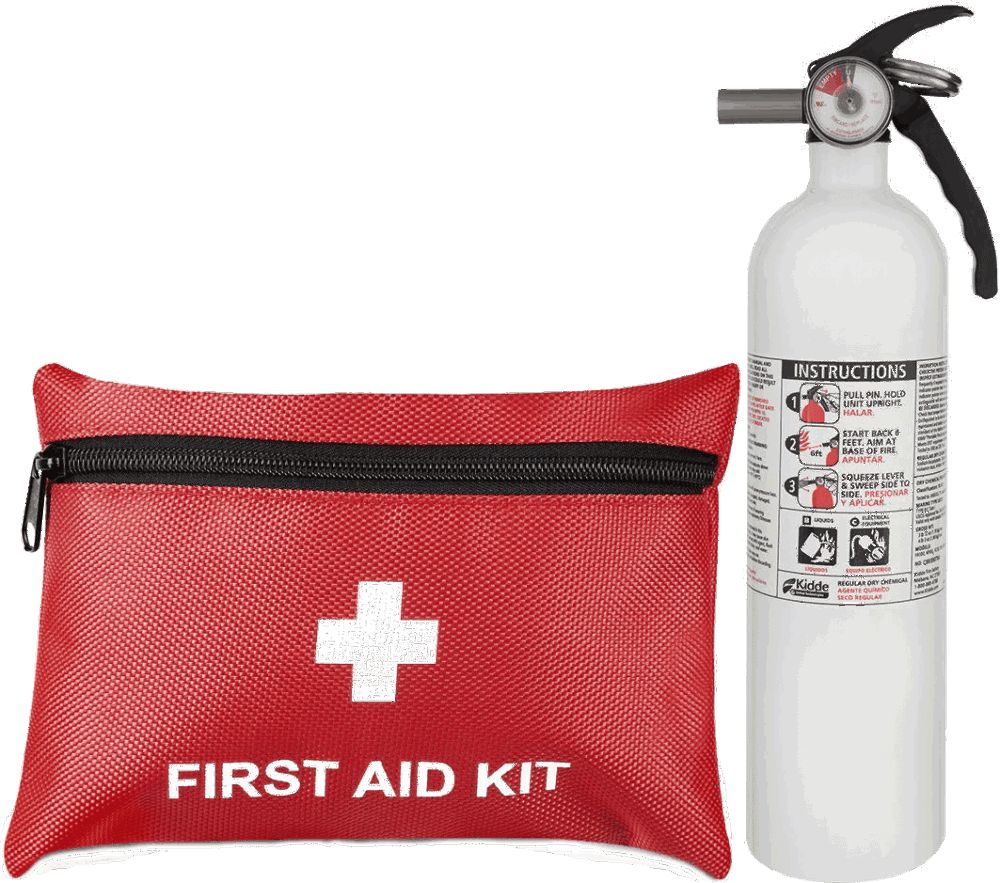
Your vehicle should have a dedicated space for fire extinguishers, first aid kits and emergency tools. These are lifesavers when needed most. Build small compartments or mount brackets inside so safety gear stays put during rough rides.
Securing Valuables and Electronics
Something to consider adapting a vehicle for landscape photography would be lockable storage for any valuables. This could be the draw system, a center console system or a lockbox secured to the vehicle. They might seem like overkill but can save your gear and peace of mind.
Preparing for Emergencies
An absolute must is to pack a first aid kit, extra supplies like water and a communication device such as a ham or grms radio, or now may be the time to look at Starlink as an option. Have an emergency plan in case something goes wrong. Share your plans with friends or family, especially for longer trips. If you have connectivity send a regular update of your position. Develop a routine for emergency situations: what to do if your vehicle breaks down or you get lost. Preparation can make all the difference when seconds count.
Testing And Improving
It’s important to test before you rely heavily on any part of your build. Inevitably, when adapting a vehicle for landscape photography, there will be an ongoing process of impoving as time goes by. I tend to have more free travel than MrsFaceless and I particularly despise the 3am alarm clock when I have to then drive 90 minutes from the nearest hotel to get to the sunrise location. In the words of murder detectives, that is both ‘motive and opportunity’, in this case though, to travel!
Since putting the original plans in place I have driven from the east coast to Idaho, stayed in the car for nights in Ohio, Nebraska, Iowa, Wyoming, North Carolina as well as Virginia, Alabama, Texas, Olahoma and Illinois. Temperates have ranged from slightly below freezing all the way up to the 70s fahrenheit. Clearly, that has given me food for thought and some little changes and additions have come about.
Tweak It
A few things that evolved to make the experience more pleasurable:
- Gone is the suitcase for clothing, or even the duffel bag. Now i use several 30 litre roll top waterproof bags. These can fit in the draws, be used as a pillow or be stuffed behind a seat. They are a much more efficient use of space. As the trip goes on they also separate clean and dirty clothes.
- The fire extinguisher and first aid kit now have a dedicated molle panel style mount, easily accessible from the rear of the vehicle.
- I’ve added a shelf in place of the third row seat grab handles. This is an ideal place for lightweight gear to go, like kitchen roll, a pillow or blankets.
- We carry way more wet wipes. Seriously, these small items are such a game changer to make you feel better when dirty or sweaty.
I would say never expect to be completely finished with your build. It’s a process of constant testing, use and improvement as equipment, needs or wants change.
Conclusion
Adapting a vehicle for landscape photography is a smart way to explore the outdoors comfortably and safely. From assessing your vehicle and setting priorities to designing an efficient layout and picking the right gear, each step adds up to a better overall experience and that likely means more opportunities for better photographs. The right upgrades aren’t just about gear either. They’re about creating an environment where you can enjoy every mile of your journey and subsequent stay. A well-fitted vehicle becomes a more comfortable place that makes adventures more fun. It’s an investment in being in the right place at the right time whilst not sacrificing much needed sleep or rest. With planning, patience, and a bit of effort, you can adapt any vehicle into your perfect vehicle for photography. So get ready to hit the road and enjoy the outside like never before.