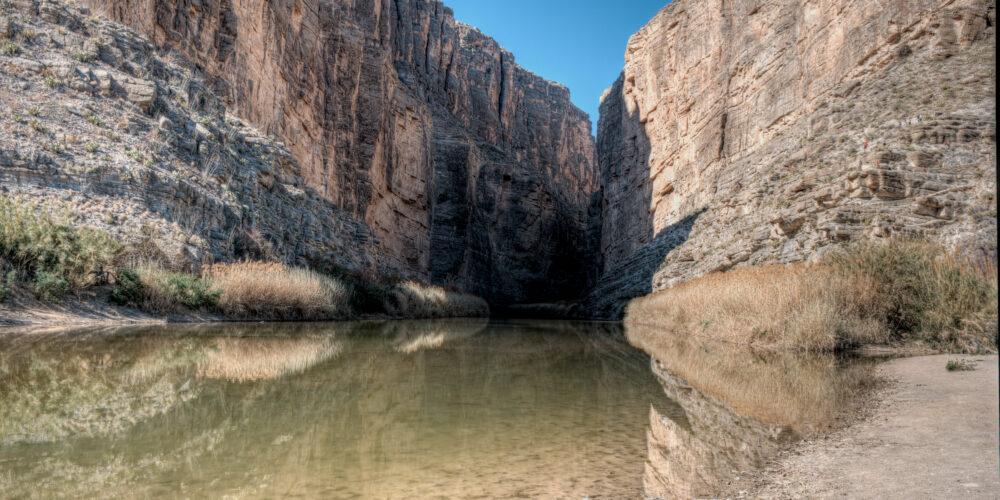
Imagine standing at the edge of a massive canyon where sheer limestone walls rise 1,500 feet high. The Rio Grande snakes through below, carving a deep path that looks like nature’s own artwork. This is Santa Elena Canyon in Big Bend National Park, a spot that pulls in photographers from all over. The way sunlight hits those cliffs can turn a simple view into something magical, full of colour and shadow.
If you love landscape photography, you’ll find endless chances to snap shots that pop at Santa Elena Canyon. The mix of desert dryness and river life creates scenes you won’t forget. This guide walks you through everything from planning your trip to editing your photos. You’ll get tips on gear, timing and tricks to make your images stand out.
We cover the canyon’s story, what to pack, how to frame your shots and ways to polish them later. Whether you’re new to Big Bend National Park or a pro at chasing light, these steps help you capture the area’s raw beauty. Let’s dive in and get you ready for your next adventure.
Discovering Santa Elena Canyon: A Photographic Gem in Big Bend National Park
Santa Elena Canyon sits in the southwest part of Big Bend National Park. This 801,163-acre area stretches across Texas along the Mexico border. The canyon formed as the Rio Grande cut through soft limestone over millions of years. For landscape photography at Santa Elena Canyon, the tall walls and winding river offer perfect backdrops.
You can reach it via the Ross Maxwell Scenic Drive, a 30-mile road full of views. Check the park’s website for entry fees, about $30 per vehicle for seven days. Spring and fall bring fewer crowds, making it easier to set up your tripod without rush for those tack sharp images.
Plan ahead for permits if you want to paddle the river or camp. The park rangers post updates on trail conditions online. This prep keeps your focus on shooting, not surprises.

The Geological Marvel of Santa Elena Canyon
The canyon stretches eight miles long. Its walls tower over the river, creating a narrow gorge that feels otherworldly. Erosion shaped these cliffs, leaving layers of rock that show Earth’s long history.
For photos, those terraces on the walls add great texture. Use them in the front of your frame to give depth. Shoot at different times to catch how light plays on the stone, turning flat rock into glowing highlights.
Hikers on the 1.6-mile trail get close-up looks at the geology. The path crosses the river on a sandy beach, then climbs a steep hill. This spot lets you capture the scale from below, making the cliffs seem even taller.
Why Big Bend National Park Draws Photographers
Big Bend covers the Chihuahuan Desert with mountains and rivers mixed in. Santa Elena is one of three big canyons here, each with its own vibe. The park’s remoteness means clean air and few lights at night.
Since 2016, it’s an International Dark Sky Park. That makes it prime for star shots over the canyon. Bring a wide lens to include the Milky Way with the river in the foreground.
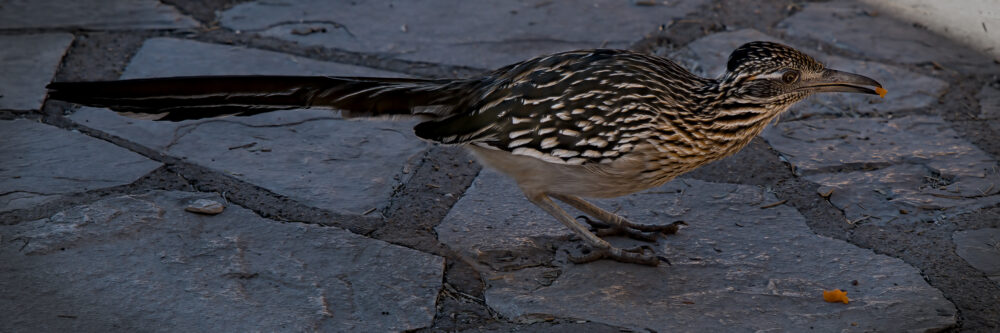
Biodiversity adds life to your frames. Cacti, birds and even roadrunners pop against the rocks. Photographers come for the quiet spots where you can wait for the right moment without distractions.
Best Time to Visit for Optimal Photography
Spring, from March to May, brings wildflowers that dot the desert floor. They add colour to your Santa Elena Canyon landscape photography. Fall offers cooler temps and golden leaves on cottonwood trees along the water.
Summer heat hits 100°F, so stick to early mornings or evenings. Winter days stay mild, around 60°F, with less haze in the sky. Always check river levels. High water can block the trail. Rains can cause canyon flooding.
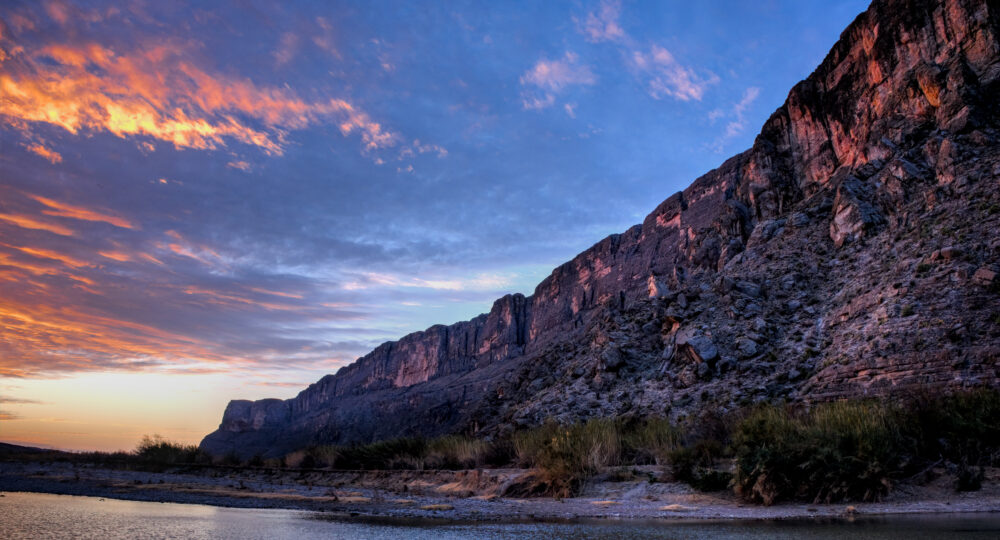
Aim for golden hour, right after sunrise or before sunset. The light warms the west wall in the morning, casting long shadows. Use apps like PhotoPills to track the sun’s path and plan your shots.
Essential Gear and Preparation for Shooting at Santa Elena Canyon
Head to this remote area with gear that handles hikes and dust. The canyon trail is short but rocky, so light packs work best. Focus on items that let you shoot steady in changing light.
Water is key; the park gets just 10 inches of rain a year. Carry enough for the day, plus a filter for refills from the river. Binoculars help spot wildlife from afar without getting too close.
Dress in layers for wind and sun. A wide-brim hat and sunscreen protect you during long shoots. Test your camera before the trip to avoid breakdowns far from help.
Recommended Camera and Lens Choices
A DSLR or mirrorless camera shines here for its controls. Go for weather-sealed bodies to fight desert dust. Wide-angle lenses, like 16-35mm, grab the full sweep of the cliffs.
Telephoto lenses, around 70-200mm, pull in distant layers for detail. They compress the scene, making the river bend look tighter. A tripod is a must for sharp shots in low light.
Add neutral density filters to blur the river’s flow. Polarizers cut glare on water, boosting colours. These tools turn basic snaps into pro-level canyon views.
Packing Essentials for a Big Bend Adventure
- Sturdy hiking boots with good grip for the rocky trail.
- At least three liters of water per person, plus electrolyte packs.
- Extra camera batteries and memory cards; no outlets nearby.
- GPS app like Gaia GPS for offline maps, since cell signal fades.
- Snacks high in energy, like nuts and bars, for all-day shoots.
- First-aid kit with bandages and tweezers for cactus spines.
Pack a lightweight backpack to carry it all. Include a rain cover for sudden showers. This setup keeps you moving without overload.
Safety and Ethical Photography Practices
Watch for flash floods; rain upstream can swell the river fast. Stay on marked paths to avoid slips on wet rocks. The border area means no drones without permits.
Follow Leave No Trace: pack out trash and step lightly on plants. Keep 100 yards from wildlife to let them roam free. Use natural light, no flash.
Scout spots early to find your angle without crowding others. This respect helps keep the park pristine for everyone. Your photos benefit from the untouched scene.
Mastering Composition Techniques for Iconic Canyon Shots
Frame the canyon to show its power. The river’s curve pulls your eye deep into the picture. Start wide to include sky and ground for balance.
Vertical shots work well for the tall walls. They make viewers feel the height. Experiment with angles from the trail to find fresh views.
Add people or trees sparingly to show scale. This technique makes the landscape feel alive and huge.
Framing the Dramatic Cliffs and River
The Rio Grande’s S-bend leads straight to the cliffs. Stand at the trail’s start to line it up. This draws attention from front to back as a leading line.
At the end of the path, drop low for a worm’s-eye view. The walls loom overhead, emphasizing their rise. Try vertical format to stack the layers tall.
Include canoe paddlers if they’re far off. They add motion without stealing focus. These steps create shots full of drama.
Incorporating Light and Shadows for Depth
Morning sun lights the west wall in soft gold. Shadows on the east side add mystery. Shoot then for warm tones that pop.
In the afternoon, contrasts sharpen the rock edges. Bracket shots: at least one normal, one darker, one brighter. Merge them in HDR to keep details everywhere.
Clouds break up harsh light, softening the scene. Wait for them to add texture to the sky. This play of light makes flat photos come alive.
Capturing Wildlife and Foreground Elements
Cottonwoods line the river with green leaves. Place them in front to frame the water. They balance the big cliffs behind.
Birds like herons fish along the banks. Sit quiet and wait; they might fly into your shot. Use a longer lens to catch them without scare.
Desert flowers or rocks in the foreground add close detail. Get low with a macro setting for sharp blooms against the vast view. These touches make your Santa Elena Canyon landscape photography richer.
Post-Processing Tips to Enhance Your Santa Elena Images
Edit your raw files to bring out the canyon’s true colours. Start in Lightroom or Photoshop for simple tweaks. Keep changes subtle to hold the natural look.
Crop tight to remove distractions like branches. Boost contrast just enough for the rocks to stand out. Save versions so you can compare.
Share high-res files online with tags for easy finds. This helps others discover your Big Bend work.
Basic Adjustments for Colour and Exposure
Fix white balance first to match the warm stone hues. Slide it toward daylight for true canyon tones. Check the histogram; pull back highlights on bright skies.
Dodge the cliff faces to lift shadows. Burn the dark river areas for balance. These moves add pop without overdo.
Sharpen the edges lightly. It makes textures crisp, like the limestone grains. Keep exposure even across the frame.
Advanced Techniques for Landscape Polish
Clone out small imperfections, like a stray bottle on the bank. Use a soft brush to blend it away. For panoramas, stitch five to seven frames side by side. Overlap them by 30% for smooth joins. This captures the full wall height in one wide shot. Adjust curves to deepen the sky blues.
Add a slight vignette to focus eyes on the center. It draws attention to the river curve. These edits polish your raw captures into keepers.
Conclusion
Santa Elena Canyon delivers top-notch spots for landscape photography in Big Bend National Park. Its tall cliffs, winding river, and desert light create images that wow. From gear picks to editing steps, this guide arms you with tools for success.
Pack smart, time your visits right, and frame with care. These habits lead to shots you’ll cherish. Edit to highlight the natural drama, then share to spread the joy.
Plan your trip soon and tread lightly. Respect the area to keep it wild. Drop your favorite Santa Elena Canyon photos in the comments—let’s see what you capture!