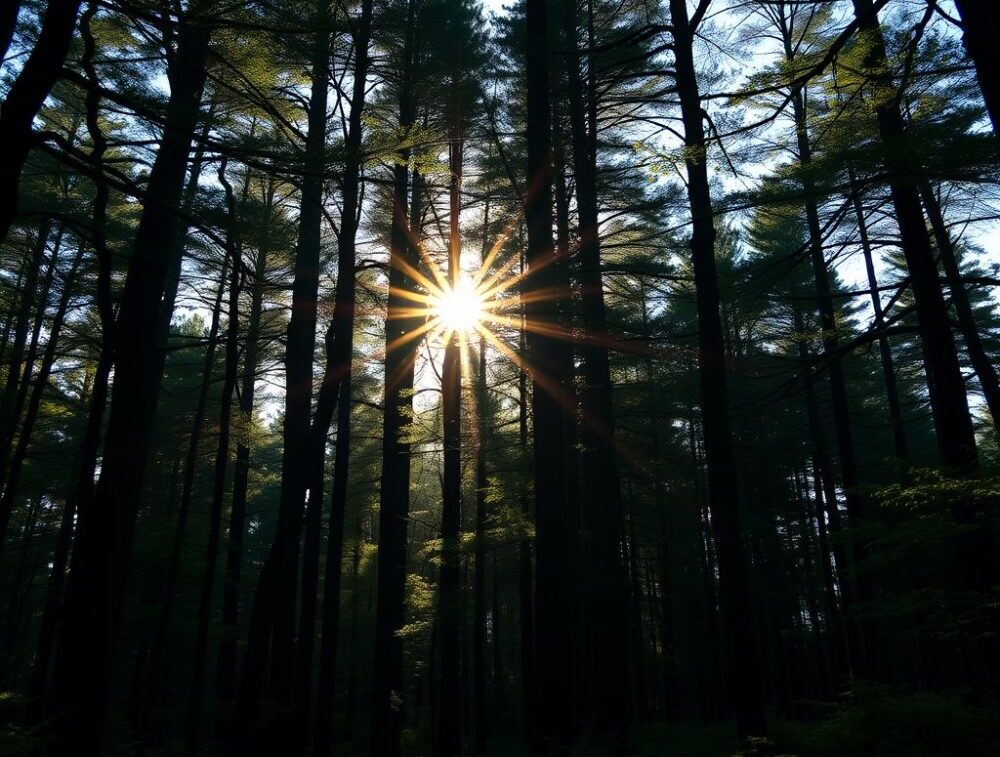
Imagine capturing a sunset. The sun peeks through the trees, creating a radiant star. That’s a sun star. They transform ordinary scenes into extraordinary images. Sun stars add a wow factor. Read on as we discuss how to get the best results when photographing sun stars.
Understanding the Key Ingredients for a Perfect Sun Star
Sun stars need certain conditions. Aperture, lens, and light each play a role. Understanding these elements is key. It is what allows you to make your own stunning images.
The Importance of Aperture
Aperture is key to creating sun stars. A small aperture (large f-number) creates diffraction. This effect makes the sun’s rays visible. Aim for f/11 to f/16 or even higher. Varying the aperture changes the sun star’s look. Smaller apertures create sharper rays. A wider aperture results in softer rays. Play around to find the sweet spot for your image.
Lens Selection: Finding the Right Glass
Lenses aren’t all built alike. Each lens creates a unique sun star shape. It all comes down to aperture blades. The number of blades affects the number of points on the sun star. A lens with 7 blades creates a 14-point sun star. More blades often mean more points. Different lenses give different effects. Experiment with your lenses to see what happens.
The Significance of Light: Angle and Intensity
The sun’s position matters. The angle and intensity affect your sun star. Golden hour light is great for photographing softer sun stars. It’s when the sun is lower. Partially hiding the sun also helps. Do this behind objects to control the effect. Angle and intensity matter. Control them and see the results.

Mastering Composition for Eye-Catching Sun Stars
Composition turns a good shot into a great one. Think about how you frame your sun star. Where you put it in the picture is essential. The other elements in the scene? They need careful thought, too.
Partially Obscuring the Sun
Never look directly at the sun. It can hurt your eyes and camera gear. Partially hide the sun behind something. Trees, buildings, or mountains work wonders. This creates the sun star effect. It also protects your gear and eyes. Safety first, always!
Finding the Right Foreground
Foreground elements add depth. They make your photo more interesting. Think about landscapes. Cityscapes and architecture also work. Find something that complements the sun star. The foreground adds interest to the image. It works with the sun star to tell a story.
Utilizing Leading Lines
Leading lines guide the eye. They draw viewers to the sun star. Use roads, rivers, or fences. These lines add depth. They lead the viewer through the scene. Leading lines make for compelling photos.
Essential Camera Settings for Crisp Sun Stars
Settings matter for crisp sun stars. Manual mode gives you the most control. ISO, shutter speed, and focus all need attention. Adjust these settings to perfection.
Shooting in Manual Mode
Manual mode is your friend. It allows full control over your camera. You choose the aperture, shutter speed, and ISO. This is vital for sun stars. Auto mode won’t cut it. You need control to get the best results.
Optimal ISO and Shutter Speed
Keep ISO as low as possible. This minimizes noise in your photos. Adjust shutter speed for proper exposure. Small apertures need slower shutter speeds. A tripod is useful then. It keeps your camera steady. Low ISO and right shutter speed? Perfect!
Focusing Techniques
Sharp focus is key to crisp sun stars. Use focus peaking if your camera has it. Or, use manual focus. Precise control makes a difference. Soft focus ruins the effect. Nail the focus for stunning sun stars.
Post-Processing Tips to Enhance Your Sun Stars
Post-processing refines your sun stars. Sharpening and contrast boost the effect. Color correction sets the mood. Removing lens flare cleans up the image. Post-processing is the final touch.
Sharpening and Contrast Adjustments
Sharpen the sun star selectively. Adjust contrast to enhance its look. Don’t overdo it. Too much sharpening creates artifacts. Subtle adjustments are best. Enhance, don’t destroy.
Colour Correction and White Balance
Adjust white balance for the right colour. Warmer tones suit sunsets. Cooler tones fit different scenes. Colours enhance the mood. Make small adjustments. The right colours bring your photo to life.
Removing Lens Flare and Aberrations
Lens flare can be distracting. Chromatic aberrations are unwanted too. Take an extra shot or two blocking the sun from hitting the front of the lens so you have non-flare images to combine in post-processing. Software tools can make it easy but i’ve not seen one which is foolproof – yet. Clean images are more appealing. Get rid of the distractions.


Safety First: Protecting Your Gear and Eyes
Photographing the sun is risky. Protect your eyes and camera. Direct sunlight can cause damage. Use filters and safe viewing practices. Safety is paramount.
The Dangers of Direct Sunlight
Never point your camera at the sun for long. It can damage the sensor. Looking directly at the sun is dangerous. It harms your eyesight. Protect yourself and your gear.
Using Filters for Protection
Neutral density (ND) filters help. They reduce sunlight intensity. This protects your lens. It also allows longer exposures. ND filters are a good idea.
Safe Viewing Practices
Use live view with caution. Avoid prolonged viewing through the viewfinder. The sun can damage your eyes. Be careful when composing your shot. Safety first, always.
Conclusion
Photographing sun stars involves skill. Aperture, lens choice, and composition matter. Camera settings are vital. Post-processing adds the final touch. Remember safety. Experiment and practice to improve. Sun star photography can be rewarding. Keep shooting and have fun!
A Selection Of Guide Articles
Adapting A Vehicle For Landscape Photography
We talk about the thought process and steps we took to make life easier when adapting a vehicle for landscape photography
RAW Format Photography
Understanding Camera RAW format files and why they are best for photographers wanting optimal image quality and processing flexibility
Mastering Exposure
Mastering exposure requires understanding of the three principal mechanisms: shutter speed, aperture size, and the photographic material's level of sensitivity to light (ISO)
Essential Filters for Landscape Photography
Read about the essential filters for landscape photography to make your life easier and take your images to the next level
How To Photograph Winter Landscapes
How to photograph winter landscapes, gear, what you need to consider and understanding the how snow affects light
Planning A Photography Roadtrip
A guide to planning a photography roadtrip. How to find locations, what to pack and tips to get the most from your trip
Create Dramatic Landscape Photos
Luck, light, skill and perseverance are just some of the facets needed to create dramatic landscape photos
Landscape Photography: Portrait vs. Landscape Orientation
Comparing composition techniques and when to use landscape versus portrait orientation