
Ever see a picture where the subject is super sharp, but the background is a creamy blur? Want to make images just like that? The secret is understanding aperture.
Aperture is the opening in your camera lens that lets light in. Think of it like the pupil of your eye, which gets bigger or smaller depending on the amount of light. Changing the aperture affects the brightness of your photos and it also controls the depth of field (how much of your image is in focus).
Aperture is a big deal because it helps you control the light and depth of field in your images. With it, you can also impact the overall sharpness of the picture.
This guide will simplify aperture, helping you to creatively control your camera. Let’s dive in!
Understanding the Aperture Scale (f-stops)
Aperture can seem tricky because of the numbers used to describe it. We’re here to make it simple.
What are f-stops?
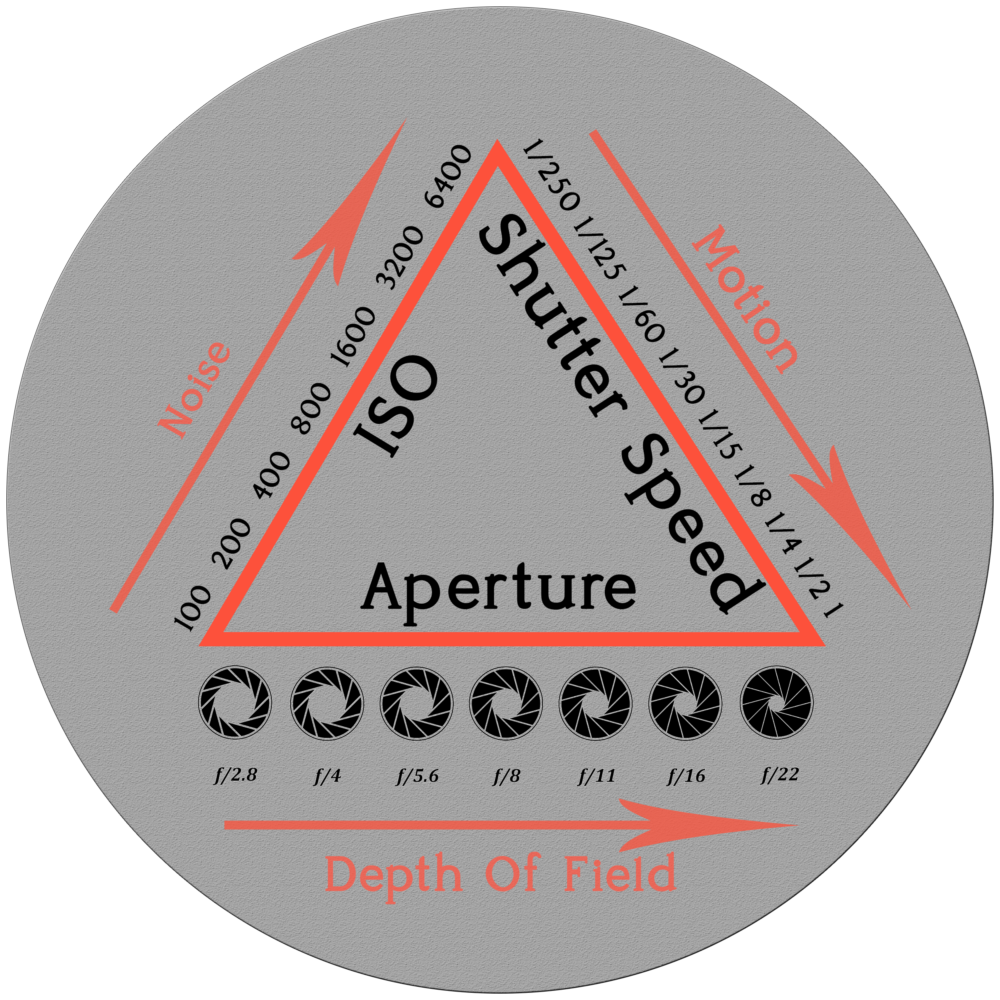
Aperture settings are measured in “f-stops,” such as f/2.8, f/8, or f/16. These numbers can be confusing at first, but they represent the size of the lens opening.
The standard f-stop sequence goes like this: f/1.4, f/2, f/2.8, f/4, f/5.6, f/8, f/11, f/16, f/22. Each step either doubles or halves the amount of light that enters the camera. This means moving from f/8 to f/5.6 lets in twice as much light, while moving from f/8 to f/11 lets in half as much.
Many lenses also have intermediate f-stops, such as f/3.5 or f/6.3. They give you finer control over your exposure.
The Inverse Relationship: Smaller Number, Bigger Opening
Here’s the tricky part: smaller f-numbers mean bigger lens openings. For instance, f/2.8 is a wider opening than f/8. It’s an inverse relationship!
Think of it like this: f/2.8 lets in a flood of light, while f/16 is like a tiny pinhole.
Each full stop changes the light amount by a factor of two. If you change from f/4 to f/5.6, you’re cutting the light in half.
Aperture and Exposure: Balancing Light
Adjust aperture along with shutter speed and ISO to create a properly exposed photo.
Aperture as a Light Controller
A wide aperture (like f/2.8) lets in more light. This is helpful in dark situations. On the other hand, a smaller aperture (like f/16) lets in less light, which is better for bright conditions.
When you adjust the aperture, you will often need to adjust the shutter speed or ISO to maintain a balanced exposure.
Balancing Aperture with Shutter Speed and ISO
Aperture, shutter speed, and ISO form the “exposure triangle.” Each setting affects the others.
If you want a shallow depth of field for an image, you might choose a wide aperture like f/2.8. Because this setting lets in a lot of light, you may need to increase your shutter speed or lower your ISO to avoid overexposure.
Try this: practice adjusting aperture, shutter speed, and ISO in different lighting. See how they affect the final image for a given metering mode.
Depth of Field: Creating Focus and Blur
Depth of field is the secret sauce for creative photography.
What is Depth of Field (DoF)?
Depth of field (DoF) is the area in your image that appears sharp. A “shallow depth of field” means only a small portion of the image is in focus, with the background blurred. A “deep depth of field” means most of the image is sharp, from foreground to background.
Shallow DoF can isolate a subject, making it pop. Deep DoF is great for landscapes where you want everything sharp.
Factors Affecting Depth of Field
Several factors control depth of field: aperture, focal length, and subject distance.
- Aperture: Smaller f-numbers (like f/1.8) create a shallower DoF. Larger f-numbers (like f/16) create a deeper DoF.
- Focal Length: Longer focal lengths (like 200mm) produce shallower DoF. Shorter focal lengths (like 24mm) result in deeper DoF.
- Subject Distance: The closer you are to your subject, the shallower the DoF. The farther away, the deeper the DoF.
Experiment with these factors. See how changing each one affects the blur in your photos.
Using Depth of Field Creatively
Here are some ways to use depth of field for cool effects:
- Portraits: Use a wide aperture (like f/2) to blur the background and focus attention on the person.
- Landscapes: Use a narrow aperture (like f/11) to keep the entire scene sharp, from the foreground rocks to the distant mountains.
- Macro Photography: Use a very shallow DoF (achieved with a wide aperture and close focusing distance) to isolate small details on tiny objects.
Aperture and Image Sharpness
Aperture also affects how sharp your images turn out.
The Sweet Spot: Optimal Aperture for Sharpness
Every lens has a “sweet spot” where it’s sharpest. Usually, this is around f/5.6 to f/8.
At these apertures, the lens produces the clearest and most detailed images.
Going too wide (like f/1.4) or too narrow (like f/22) can sometimes reduce sharpness because of lens issues or diffraction.
Diffraction and Aperture
Diffraction happens when light waves bend around the edges of the aperture. At very small apertures (like f/16 or f/22), diffraction can soften your image.
It’s wise to be aware of diffraction. Avoid very small apertures unless you need the extra depth of field.
Practical Applications: Choosing the Right Aperture
Let’s look at some common situations and the best aperture choices for them.
Portraits
For portraits, shoot with wider apertures (like f/1.8 to f/2.8). These settings create a shallow depth of field, blurring the background..
Landscapes
Landscapes usually look best with narrow apertures (like f/8 to f/16). These ensure everything from the foreground to the background is sharp.
Use hyperfocal distance to maximize sharpness in your landscape photos.
Street Photography
In street photography, strike a balance with something like f/4 to f/8. It provides enough depth of field while still letting in plenty of light.
Capture candid moments while keeping the main subjects in focus.
Macro Photography
Macro photography often requires small apertures (like f/11 to f/16) to get enough depth of field.
Keep in mind, using such small apertures can be tough due to reduced light. A tripod and good lighting can really help here. If your camera supports it try focus stacking (also known as focus bracketing).
Other Important Ingredients
Aperture is but one small part of the photo taking process. Consider leading lines, drama in your composition, the rule of thirds, sharpness, the reciporocal rule, shutter speed and ISO as contributing factors as you make that perfect image.
Conclusion
Aperture is a powerful tool. It controls light, depth of field, and sharpness.
Practice and experiment to see what works best for your style.
Use what you’ve learned to take creative control of your photography. Now, go take some amazing pictures!
A Selection Of Guide Articles
Using Reflections In Landscape Photography
We look at how to best use reflections in landscape photography as the method to add symmetry to you compositions
Adapting A Vehicle For Landscape Photography
We talk about the thought process and steps we took to make life easier when adapting a vehicle for landscape photography
RAW Format Photography
Understanding Camera RAW format files and why they are best for photographers wanting optimal image quality and processing flexibility
Mastering Exposure
Mastering exposure requires understanding of the three principal mechanisms: shutter speed, aperture size, and the photographic material's level of sensitivity to light (ISO)
Essential Filters for Landscape Photography
Read about the essential filters for landscape photography to make your life easier and take your images to the next level
How To Photograph Winter Landscapes
How to photograph winter landscapes, gear, what you need to consider and understanding the how snow affects light
Planning A Photography Roadtrip
A guide to planning a photography roadtrip. How to find locations, what to pack and tips to get the most from your trip
Create Dramatic Landscape Photos
Luck, light, skill and perseverance are just some of the facets needed to create dramatic landscape photos