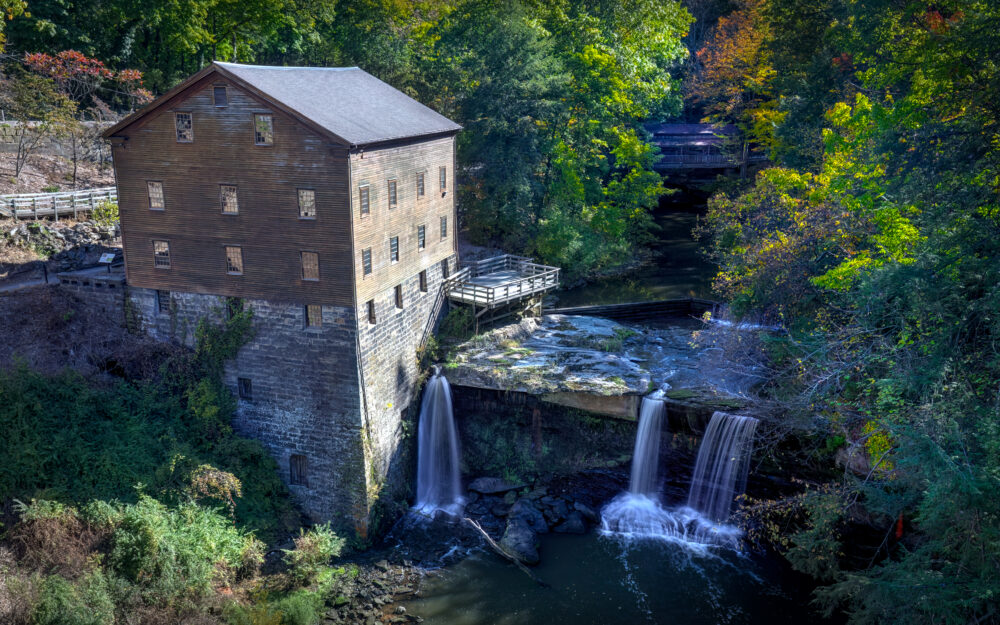
Heading out on an autumn landscape photography roadtrip, MrsFaceless and I had spent our first night in western Pennsylvania, followed by an early morning visit to McConnells Mill State Park. When planning our route, there was another mill not to far away that also looked extremely photogenic. So after a short drive, we arrived at our second stop, Lanterman’s Grist Mill in Ohio. Photographing the mill gives you a mix of old-time charm and wild nature. It’s perfect for anyone who loves photography, but can’t quite make the long hikes anymore. This mill can be photographed from the road. Well, to be more precise, the road bridge over Mill Creek. In this article, we’ll cover simple tips on when to go, what gear to pack and tricks to get great shots. You’ll learn how to frame the mill just right and edit your photos later. By the end, you’ll feel ready to capture your own memories there.
History and Background of Lanterman’s Grist Mill
Lanterman’s Grist Mill sits quietly below a busy road in the heart of Ohio. Built long ago, it draws folks who want to blend history with their photos. Knowing its past adds depth to every shot you take.
The Mill’s Origins and Restoration
German Lanterman put up the mill between 1845 and 1846. He wanted a spot to grind corn and wheat for local farmers. This was the third mill to be placed at this site. In 1982, work began to explore the site and restore Lanterman’s Grist Mill to its former glory. The mill ground flour until the early 1900s. Then it stood quiet for years. Now, it’s a working example of pioneer life. When you photograph it, think about those hands that once turned the wheel. That story shows in the stone walls and rusty iron. For more facts, look at local history groups online.
Significance in Mill Creek Park
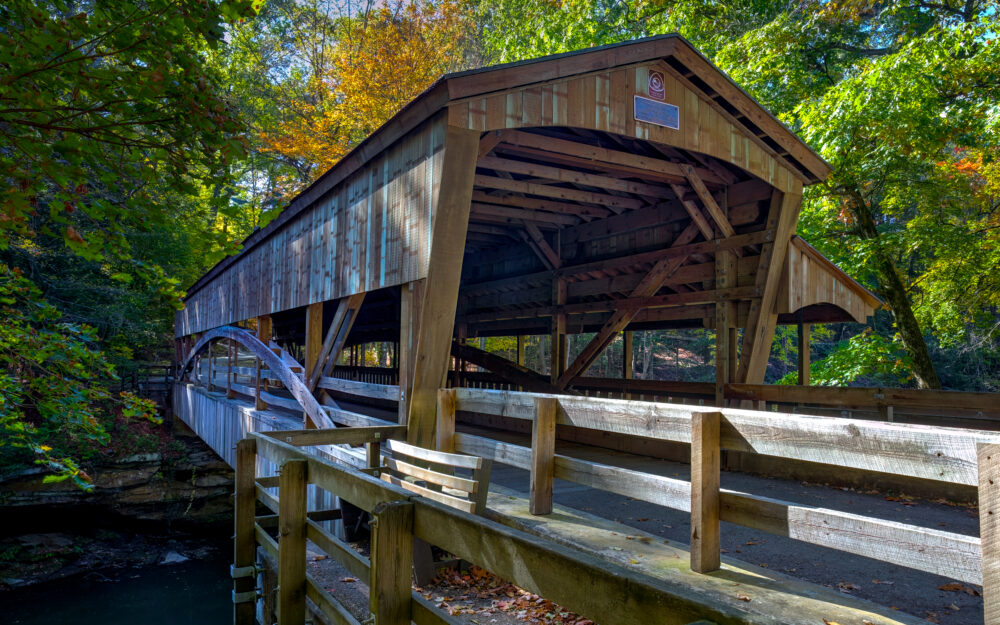
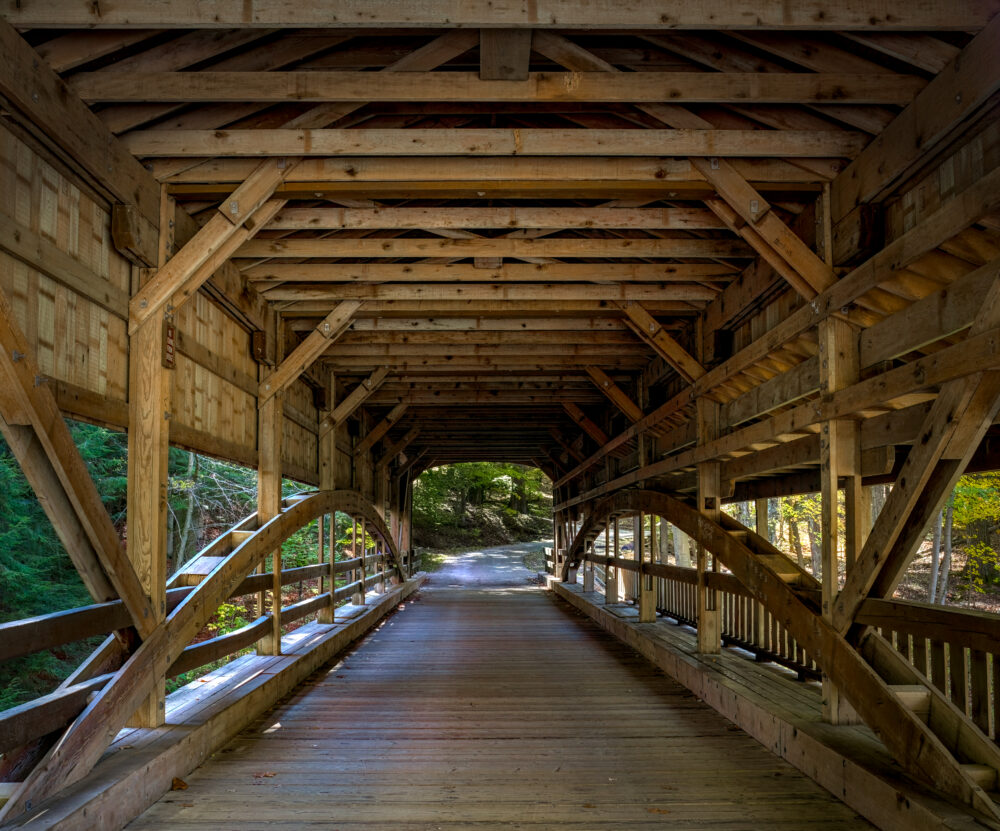
This mill anchors Mill Creek Park, a huge 2,600-acre spot in Youngstown, Ohio. Trails wind around waterfalls and woods, giving you endless backgrounds for shots. Photographing here means catching the mill against all that green space. It’s a top pick for landscape fans who chase Ohio’s hidden gems. The creek adds motion, like a living frame for your images. Walk the paths, and you’ll see how the mill fits into the bigger picture. Deer might peek from the trees, or birds flit by the water. This setup lets you mix wide park views with close mill details. No wonder it’s a favorite for Ohio travelers with cameras. There’s also a covered wooden bridge over the creek, but sadly that is mostly obscured by vegetation.
Best Times and Locations for Shooting
Timing your shoot at Lanterman’s Grist Mill can make or break your photos. Light hits the old stones just right at certain hours. Crowds stay low if you pick smart spots. Let’s break down when and where to aim your lens.
Optimal Times of Day and Year
Go at golden hour, right after sunrise or before sunset. The warm light paints the mill in soft glows. Avoid noon when the sun beats down hard, casting flat shadows. Park hours run from dawn to dusk, so you can catch early light easy. Autumn shines brightest with colourful leaves framing the creek.
Spring and fall draw fewer people than summer picnics. Check weather apps like Windy for Ohio’s quick storms. Winter mornings offer crisp air and frosty details on the wheel. Plan around these to get the best time to photograph Lanterman’s Grist Mill.
Year-round, the mill’s charm holds steady. But peak leaf season in October packs the paths and that exactly coincides with our trip. The best idea would be to arrive early to claim your spot. However, we had driven about 90 minutes to get there after already photographing another mill. So, as expected, the light was not as good as it could have been. Plus, although I wouldn’t say it was crowded, there was a steady flow of tourists, dog walkers, runners and obviously, photographers!
Key Viewpoints Around the Mill
Start at the covered bridge for a classic overlook. Frame the mill through the wooden arches as it pulls the eye right in. We tried this but there were simply too many people in shot. Hike the short trail for side angles of the wheel in motion, if it’s running. On the day we were there….it wasn’t. We found the best views are from the road bridge looking down. It’s worth noting that edging left or right a little makes a big difference to the compisition. Walk slow and test a few frames from each.
Weather Considerations
Overcast skies work wonders for close-ups of the mill’s textures. No harsh light means even tones on stone and wood. Clear days suit wide shots of the park’s full sweep. Misty mornings add fog for dreamy effects around the creek. Pack a rain cover as Ohio showers pop up fast so check forecasts. Cool days keep you comfy for long setups. Wet gear? Dry it quick to avoid spots on your lens so carry a microfiber cloth with you. These tips help you handle whatever the sky throws.
Essential Gear and Preparation Tips
Pack light but smart for Lanterman’s Mill. The terrain mixes paths and rocks, so gear needs to handle it. Focus on basics that let you shoot architecture and water without hassle.
Recommended Camera and Lens Choices
Grab a DSLR or mirrorless camera. A wide-angle lens, like 16-35mm, fits the whole mill and creek in one frame. Switch to telephoto, 70-200mm, for tight shots of gears or minute details. Add a polarizer filter to tame glare off the water. It makes blues pop and cuts reflections. Test your setup before the trip. Keep it simple. No need for fancy add-ons at first.
Accessories for Mill Creek Park Conditions
A sturdy tripod steadies long exposures of the falling water. Extra batteries fight the cold drain in winter shoots. Waterproof bags shield your kit from creek splashes. A light backpack holds it all for trail walks. Don’t forget a lens cloth for dust or mist. Sturdy shoes help you reach good angles. These items make your day smooth in the park.
Pre-Shoot Planning Checklist
- Study park maps online to plot your route.
- Charge cameras and phones fully.
- Practice rule of thirds for better frames.
- Check for any entry fees or rules.
- Use the internet to preview locations and images virtually.
Follow this list and you’ll hit the ground running. Scout once if you can. It saves time on the day.
Techniques for Capturing the Mill
Get hands-on with your camera at the mill. Simple rules turn average shots into keepers. Focus on what makes this place tick like the wheel, water and stones.
Composition Strategies for Historic Structures
To ensure your mill photos stand out, composition is key when it comes to landscape photography. Use the rule of thirds to guide your framing, placing points of interest off-center for a more dynamic look. Leading lines, such as bridges or paths, can draw the viewer’s eye into the frame. Use symmetry in the available features for balance and interest. Know your camera. Understand metering modes, ISO, aperture and shutter speed to gives your image a good exposure. Know how to get sharp photos. If you’re on a tripod think about bracketing exposures for hdr to gather all of the dynamic range information on your sensor. If taking a photo handheld then read up on the reciprocal rule.
Experiment
And don’t shy away from experimenting. Try shooting during different times of day to capture varied lighting. Changing orientation between portrait vs landscape allows for perfect framing of differing compositions. Remember, it’s not just about what you’re photographing, it’s how you photograph it to create dramatic landscape photographs!
Creative Angles and Perspectives
Climb a bit for overlooks, or wade close for intimate creek shots. Get down low too. Mix it up as standard views bore quick. Experiment to find your style here.
Utilizing Natural Light
Natural lighting is like the magic wand of photography, so wave it at your subjects and make them transform! As already mentioned, early mornings and late afternoons, known as the golden hour, are ideal for capturing the enchanting glow on the landscape. Overcast days can be just as great, softening shadows and bringing out the colours. Just avoid harsh midday sun unless you enjoy blown out highlights and squinty faces. Keep an eye on the weather.
Textures and Details
Autumn brings new textures to the landscape as its surfaces start to dry and crinkle, highlighting details that might go unnoticed in other seasons. The contrast between the lush vegetation and that which is dying off for winter creates a stark contrast in texture as well as colour. Remember to get low and focus on those details. The small things often have the biggest impact!
Incorporating Surrounding Nature
The surrounding landscape is an essential part of the overall aesthetic with landscape photography. Watkins Glen State Park, and particularly The Gorge Trail, have jagged rocky features in abundance. Mix these with running water and man made structures like stone bridges and paths to bring the scene to the next level. Frame your shots to include these elements
Tips for Taking Stunning Autumn Images
Autumn portraits can be magical. But capturing that magic requires some nifty tricks.
Selecting the Right Backgrounds
When choosing backgrounds for autumn portraits, look for contrasting elements. The ruggedness of the stone bridge paired with the glow of golden foliage makes for a striking combination. Look around you for additional components as these can help your subject stand out against the landscape. Don’t shy away from experimenting. Sometimes the quirkiest locations yield the most memorable shots!
Adjusting Settings for Low Light
Expose for the bright water next to dark stones. It keeps details in both. Bracketed images for HDR blends shots for even tones in tricky light. At golden hour, bracket three exposures to fix later. Shadows add mood, so don’t fight them all. Watch how sun moves over the facade. Soft light flatters the old bricks. Increase your ISO to capture more light, but keep an eye out for noise. A wider aperture (smaller f-stop number) can help as well, allowing more light in while creating a lovely background blur. If you’re battling low light, don’t forget to balance with a slower shutter speed; just make sure your subjects are still for a moment.
Try these and your photos of Lanterman’s Mill will hook anyone
Post-Processing Fall Photographs
After capturing that fall magic, it’s time to bring your photos to life in the editing room.
Paid Or Free Software
By all means, pay for the photo editing software of your choice. MrsFaceless and I use a mix of paid and free software from an old version of Photoshop, Topaz DeNoise, Photomatix, Darktable and Gimp. The majority of our editing is now done in Darktable.
Basic Editing Techniques
Once you’ve snapped that perfect shot, it’s time to give it a little TLC in post-processing. Start with basic adjustments. Tweak the exposure, contrast and white balance to make your photos sparkle. Cropping can also help you refine your composition, so don’t hesitate to trim the edges if it means a more impactful image.
Enhancing Colours and Contrast
Autumn photographs should not have muted colours. To give your images a new lease on life, increase the contrast and saturation (slightly) to accentuate the reds and golds. A little tweaking goes a long way. Just avoid the temptation to go overboard, or you might end up with a photo that looks like it belongs in a cartoon!
Creating a Fall Mood in Edits
To evoke that cozy, autumnal vibe, try adding a golden tone to your images. This will enhance the feeling that the natural fall colours brings. You may also want to play with a vignette effect to draw focus toward the center of your photograph.
Conclusion
Photographing Lanterman’s Mill in Ohio mixes easy fun with real rewards. Pack wide lenses and a tripod, hit golden hour and frame with leading lines for top shots. Post process with consideration to warm up those stone tones. Plan to catch the mood, compose thoughtfully and edit with care. The mill’s story lives in your ability to recreate the moment.